5 Ways How To Color Grade Apple Log on iPhone 15 Pro Max
You filmed your footage in Apple LOG with the iPhone 15 Pro or Pro Max. So, how to color correct or color grade the flat looking footage by using also the iPhone?
Many people show you how to color grade in DaVinci Resolve, Final Cut Pro X, or Premiere Pro. In this post, I'll show you 5 ways to use the iPhone to accomplish this and make you footage goes from FLAT to CINEMATIC grading.

1. WAY Native Photo APP
Let's start with the first way by using the native photo editing app to correct your LOG footage.
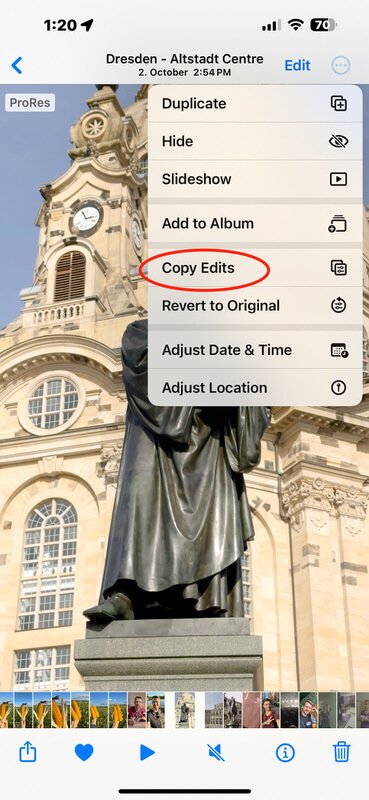
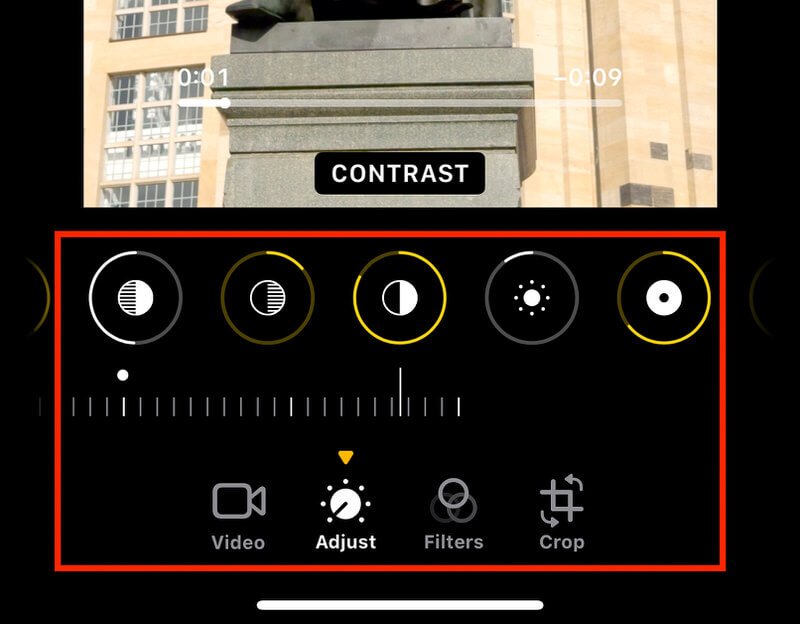
Film or choose your Apple LOG footage, then open the clip and click on EDIT in the right top corner. After that, you click the second icon at the bottom to adjust.
Start with the CONTRAST first by going nearly to 100% and then bring back some shadows from the mid range of the clip. Don't overdo it because you will increase noise. Adjust the highlights next, and watch the sky and lights to not burn out, basically don't overexpose them.
Use BLACK POINT to get deeper blacks, but be careful that it doesn't appear too dark.
The exposure tool is mostly used for bringing up everything, or the brightness tool for lifting up and then the BLACK POINT to punch up the contrast. It depends on how you want it.
Once the exposure is adjusted, I boost the vibrance and saturation a bit. Please be careful as it can color shift and bring in a lot of green or purple colors. Next, I adjust the color temperature with WARMTH to make it look more warm or cold, and then the TINT to change the color shift of green and purple while checking the skin tone color is looking right. I then adjust the saturation or vibrancy again to balance it all.
Saturation vs. Vibrance: what is the difference?
The saturation in your clip will enhance all the colors.
Vibrance raises up colors in the clip that are less dominant or lowers down colors that have a lot of dominance.
You can now ADD SHARPNESS, but don't overdo it so it looks natural. When you filmed in low light, use NOISE REDUCTION to denose your clip.
You can either save this clip or copy and paste the grade to another clip. Click on the three dots in the top right corner. You can then copy the edits and paste them on the next clip.
You can then adjust the exposure or other parameters if necessary.
IN MY VIDEO YOU CAN FIND A GUIDE HOW IT LOOKS LIKE
—-> Link to YOUTUBE Super easy and quick way.
2. WAY Use Luma Fusion APP
With Luma Fusion, you can edit mobile or on your iPad for 22.99 euro. It is possible to add a conversion LUT and edit presets.
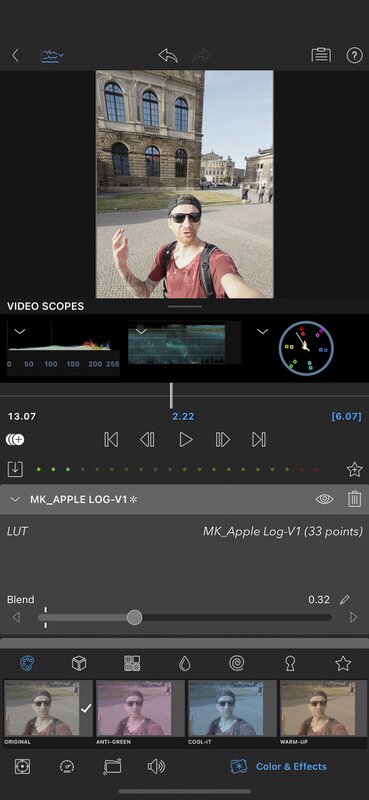
Once Luma Fusion has been opened, import your LOG Clip and double click it. Go to the last icon at the bottom right of the screen (Color & Effects). When you click the first left icon, you will see the adjustment options. Select ORIGINAL to open the color grading tap for adjusting exposure, contrast, white balance, colors, etc. Following the same workflow as before, add contrast first, then exposure, white balance or color temperature, then saturation and vibrance.
To save time, you can also DOWNLOAD HERE my LUTS and editing presets for LUMA FUSION.
Click the Import Presets and LUUTs button on the left after downloading.
Choose the location where you saved it. Let's say we import them from the FILE APP. One has an APPLE LUT conversion and one has a pre-color grade effect.
This is just a guideline and can vary from clip to clip. So you have to adjust afterwards.
3. WAY is to use the Dehancer mobile app
With the Dehancer App you can select the source camera profile for Apple Log and convert it in just seconds. Not to mention the endless possibility of creating moody or film look with your iPhone.
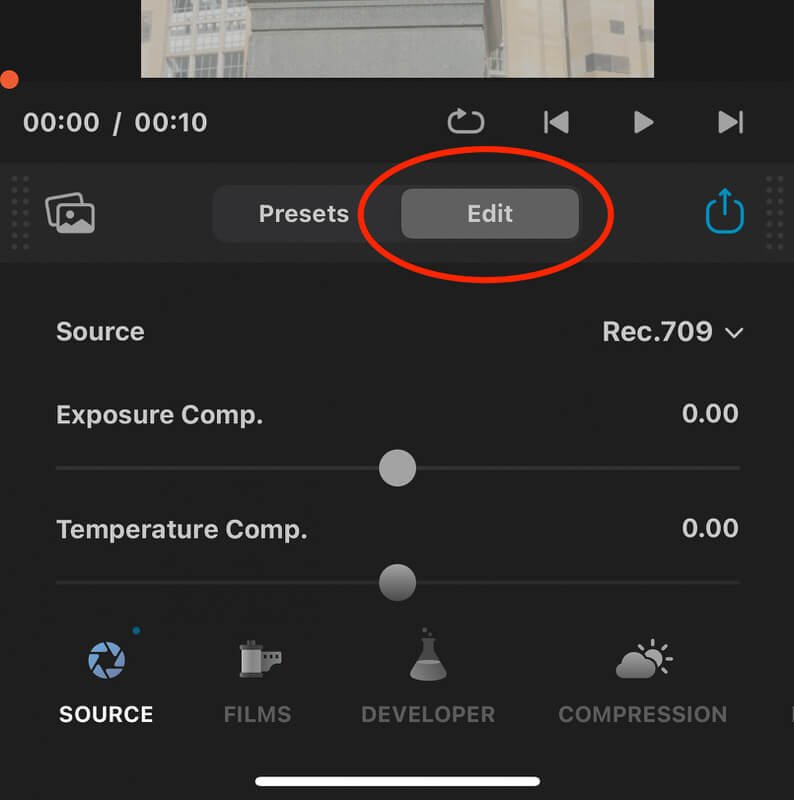
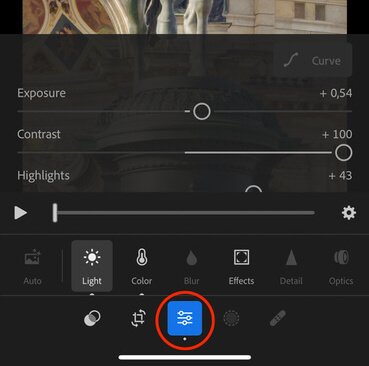
As soon as you open the Dehancer, choose the clip you want to change from a Flat Apple LOG to an amazing standout clip. Firstly, go to EDIT, then click the second icon after the histogram icon on the top left corner to RESET ALL EDITS.
Click the first icon in the bottom menu to select SOURCE, and then select Apple Log as the Profile. You can adjust the Exposure and Total Contrast, the saturation, and the color density from here.
Go to the DEVELOPER section and boost the contrast, Gamma, or colors if necessary.
Go next to the COMPRESSION section, where the HIGHLIGHTS can be restored insanely well. Play around, but a full tutorial will follow.
In the FILMS section, you will find an amazing feature that allows you to add film profiles like Fuji film profiles, Kodak film profiles and many others.
Although I don't want to go into too much detail about how to use the Dehancer APP, you can basically recreate all the Film Emulation looks adding Film Grain, Halation, Bloom, Film Breath, and Gate Weave. This is an incredible app that I also use to color grade my videos in DaVinci Resolve with the Dehancer plugin.
I provide you with a 10% discount by using the promo code "MAIK", you will save some cash and support my work as well, so win win. Thanks. (Dehancer Website, iPhone App)
If you have any question feel free to reach out to me IG: @MAIKKLEINERT
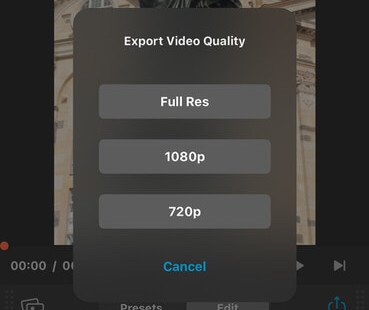
After you finished grading in the Dehancer app, you have 3 export resolution to save it.
HD 720p
FULL HD 1080p
FULL RES 4K.
It’s amazing as you can choose Full HD for Social Media or FULL RES for editing later also on your computer if you want.

You can test the app for FREE with a watermark. The watermark can be removed with a subscription or one-time payment, and you can use the professional correction and grading options on your phone when you edit all your LOG recordings on your iPhone or iPad.
You can subscribe weekly for 6,99€, monthly for 9,99€, yearly for 99,99€ or make a ONE-TIME payment of 449,00€.
There is no doubt that this workflow is time-efficient, professional, and of the highest quality. It takes a matter of seconds for the edits to be completed and you can share your cinematic looking footage on social media.
4. WAY Adobe Lightroom
Open the Adobe Lightroom app and import your footage. Go to the bottom, click the middel icon to adjusting everything by using the slider as you know from photo editing.
You can also save presets and copy them to other clips once you're done. The next step is to export the clip, but you cannot control the resolution and it looks low res after exporting to be honest.
5. Way BlackMagic Camera App

In the Black Magic Camera app, you cannot color correct or color grade. It is possible to bake the Apple Conversion LUT into the recorded video clip. It will then be baked in the saved video clip.
How to do this, go to the Setting Icon and scroll down to LUTs and then enable "Display LUT" nect choose AppleLogToRec709-v-1.0 in "LUT Section". Next enable "Record LUT to Clip" DONE.
It's now possible to record and see what it would look like with the LUT baked in.
This method is only useful when recording. If you have already recorded clips without LUT, then it is FLAT footage, and you have to choose one of the options mentioned before.
Additionally, I recommend using the BlackMagic Camera App since it is FREE and you have complete control over the settings when recording in Apple LOG. Thanks BlackMagic ❤️
Okay, guys that was all and we are coming to my final thoughts about all.
Final Thoughts
For a quick and dirty edit, you can use the native photo app. If you want the best result and improved workflow, then I recommend Dehancer, as it has a lot of other features for amazing looking graded footage by just using your phone.
I appreciate you reading this or watching my video on YouTube. To see more videos like these, follow me on social media or subscribe to my YouTube channel.
Let me know if you have any questions in the comments. We'll see you in the next blog post or video. Keep being creative!
It would mean a lot if you share my blog post on your social media or with friends, so I can help more people. If you got some value, feel free to send me a donation, this will support the work I do.
Check out my Video on Youtube
👍🏻Like, Share and Subscribe 🙏❤️😀
TOOL LIST FOR CREATORS:
🎞️ 🎶 | All My Music, SFX & Stock Footage comes from ►► https://geni.us/ARTLIST-ARTGRID-MK
🤖 | All My Title Animation and Motion Designs comes from ►► https://geni.us/MotionVFX_Davinci
🔴 | (TubeBuddy) YouTube Title & Keyword tool I use: ►► https://geni.us/TubeBuddy-MK
Color Grading Tools:
🎨 | DeHancer - 10% OFF code "MAIK" ► https://geni.us/DeHancer
BEST Film emulation, Filmlook, Film Grain, Halation, Bloom
1. Click the Link ► https://geni.us/DeHancer
2. Click on BUY, then enter the Promo Code "MAIK"
You get then 10% DISCOUNT on Dehancer software
🎨 | Cinema Grade “MAIK“ *GET 20% DISCOUNT* ► https://geni.us/FREE-PDF-CinemaGrade
Simple color grading tool with slider for Davinci Resolve, Premiere Pro, and Final Cut.
My Equipment & Education List:
🎬 | MY GEAR LIST ► https://kit.co/MaikKleinert
💻 | FREE DIGITAL PRODUCTS: Discounts, LR Presets, LUT’s ► https://www.maikkleinert.com/shop
⏰ | LRTimelapse Software- Timelapse & Hyperlapse ► https://geni.us/LRTimelapse
💰 | WIRESTOCK Selling Stockfootage ► https://geni.us/Wirestock
📚 ONLINE COURSES I joined 🎬
📹 | KOLDER CREATIVE - Sam Kolder advanced editing ► https://geni.us/KolderCreative
⏰ | Timelapse & Hyperlapse - Matjoez ► https://geni.us/TimelapseCourse
🎥 | FULLTIME FILMMAKER ► https://geni.us/FullTimeFilmaker-MK
Get your FREE Lightroom Preset Pack
FREE DOWNLOAD and ready to use for Desktop and Mobile
Beautiful orange and teal tones
Amazing Urban Street look
Complex color grades in just ONE CLICK
Faster and more efficient workflow
For Desktop & Mobile
Click Here to Download

Get your 20% discount for Cinema Grade the time-saving color grading tool.

Join The Creator Weekly


All my Music, SFX & Stock Footage comes from
Unlimited & Royalty-Free


Blinkist listing to books! Listen zu a book summary in under 15 minutes. Try it out!